Mac don’t have a PrtScn button that all Windows PCs do. That, however, doesn’t mean taking a screenshot on a MacBook is a difficult thing to do. In fact, it’s much easier than you might think, using just a few buttons. Let’s take a closer look, shall we? See How to Capture Printing Costs on Zeno Copiers
How To Take a Screenshot on a Mac—The Entire Screen
- Have your screen ready, of course.
- Press Command + Shift + 3.
- The screenshot is saved on your desktop as a PNG file.
- The image’s name will be ”Screen Shot + year + month + date at time.”
- For example, ”Screen Shot 2019-11-05 at 12.02.24 PM.”
Pressing and holding the three keyboard shortcuts will take a whole screen snapshot for you, which will automatically be saved as a PNG. But if you have more than one display, then both screens will be captured in your screenshots. If you don’t really need to capture the whole screen, you read on, as we are going to explain how you may select a partial section of your screen.
How To Take a Partial Screenshot on a Mac
- Again, have the screen ready as you’d like it captured.
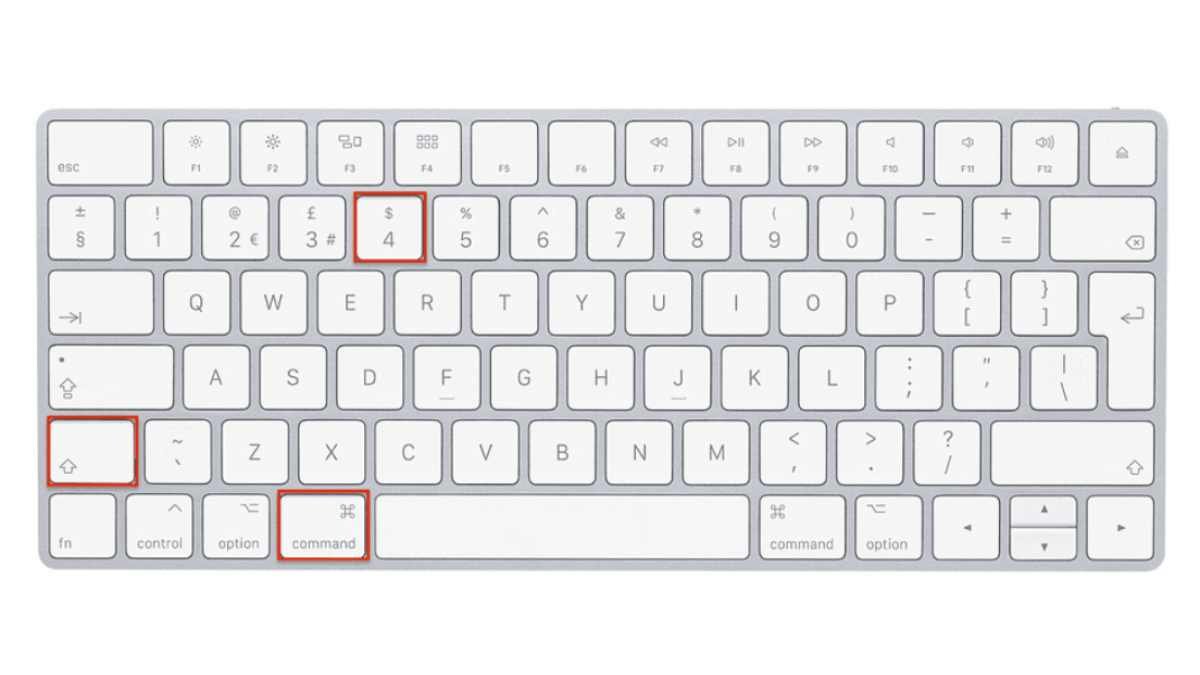
- Press the buttons for Command + Shift + 4.
- A crosshair appears to drag over the area you want to take.
- The area will be saved as a screenshot, also in PNG format.
The second method is handy if you wish to capture only a part of your screen, say an image online, or snap of a video. In any case, it’s quick and easy and can be done with just a few mouse buttons-click and drag.
You may, although are not required, use this other method to capture an image of just that one window you are searching for. MacBooks have a method to screenshot a specific window. Here’s how:
How To Take a Screenshot of a Specific Window on a Mac
- Have the window open on your screen.
- Press Command + Shift + 4.
- Hold down the space bar.
- A camera icon should now appear.
- Select the window you’d like to screenshot.
And that’s all three ways of how you can take a screenshot with a MacBook. How you like to drag in order to select an area to take a screenshot on your Mac or exactly a certain Window doesn’t make a difference. Because the image files you create this way on your desktop will get the same name each time. If you are viewing the quality of the screenshots, then it really does just come down to a matter of the type of monitor you are using.
A Retina display, for instance, will pack in much more pixel density to any given size of screen. If you are using two screens, be aware of this. You should always attempt to capture the screenshot on a MacBook’s original monitor. This will most probably give you higher-quality images also.
Take Screenshots on Any Mac OS
Even though Apple’s software continually updates, screenshotting Mac doesn’t change. Whether you’re upgrading to the latest version of Catalina, macOS Mojave, or Yosemite, the methods to screenshot Mac remain the same. For instance, if you want to find out which version your device is working on, select the Apple logo and navigate to “About this Mac” on the left side of your computer screen.
Process Your PNG Screenshots
PNGs are fabulous. They are fantastic-quality pictures that will capture your screen pixel to pixel. However, they get pretty heavy if you want to distribute these files to someone else. That’s when the issue comes in because PNG files get real bulky. For this problem, you can either convert it to PDF or JPG with our PDF converter-for all your digital document requirements. And lastly, when you have a picture in PDF format, there are more than a handful of tools you can check out on iLovemyPDF that can be used to modify, compress, or edit your files to your needs. Curious? Do check out our homepage and start playing around with the image converters. Otherwise, have fun snapping screenshots, fellow Mac users!